2. Copying a Website
Visual Studio also includes a
quick and easy way to transfer your web application files without using
a separate program or leaving the design environment. You simply need
to open your web project and select Website =>
Copy Web Site from the menu. This opens a new Visual Studio dialog box
that will be familiar to anyone who has used an HTML design program
like Microsoft FrontPage or Expression Web (see Figure 4).
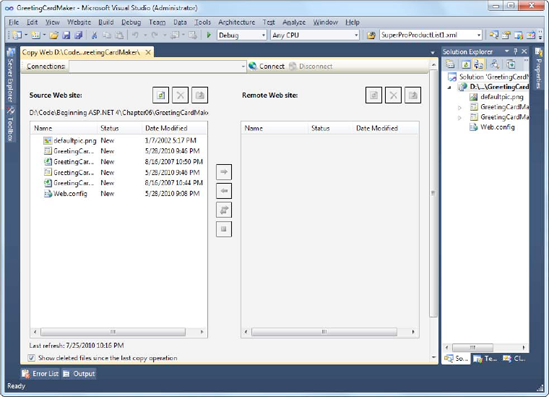
This window includes two file
lists. On the left are the files in the current project (on your local
hard drive). On the right are the files on the target location (the
remote web server). When you first open this window, you won't see
anything on the right, because you haven't specified the target. You
need to click the Connect button at the top of the window to supply
this information.
When you click Connect,
Visual Studio shows a familiar dialog box—it looks almost the same as
what you see when you create a virtual directory for a new project.
Using this window, you can specify one of the following types of
locations:
File System:
This is the easiest
choice—you simply need to browse through a tree of drives and
directories or through the shares provided by other computers on the
network. If you want to create a new directory for your application,
just click the Create New Folder icon above the top-right corner of the
directory tree.
Local IIS:
This choice
allows you to browse the virtual directories made available on the
local computer through IIS. To create a new virtual directory for your
web application, click the Create New Web Application icon or the
Create New Virtual Directory icon at the top-right corner of the
virtual directory tree, as you learned earlier.
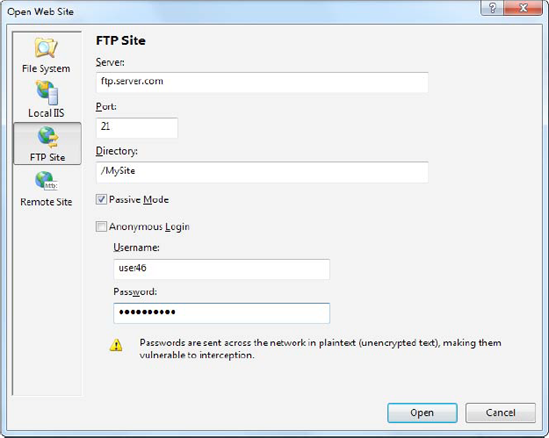
FTP Site:
This option isn't
quite as convenient as browsing for a directory—instead, you'll need to
enter all the connection information, including the FTP site, port,
directory, and a user name and password before you can connect (see Figure 5).
Remote Web Server:
This option accesses a
website at a specified URL using HTTP. For this to work, the web server
must have the FrontPage Extensions installed. When you connect, you'll
be prompted for a user name and password.
Once you
choose the appropriate destination, click Open. Visual Studio will
attempt to connect to the remote site and retrieve a list of its files.
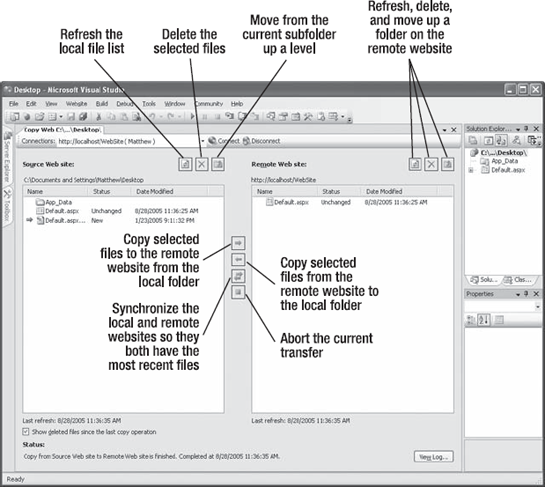
The Copy Web Site feature
is particularly useful for updating a web server. That's because Visual
Studio compares the file list on the local and remote websites, and it
flags files that exist in one location only (with the status New) or
those that are newer versions (with the status Changed). You can then
select the files you want to transfer and click one of the arrow
buttons to transfer them from one location to the other (see Figure 6).
3. Publishing a Website
The website copying
feature is great for transferring files to a test server. However, it
doesn't give you the option of precompiling your code. If you're
deploying your application to a live web server and you want to keep
the source code tightly locked down, you'll want something more.
As described earlier in this
chapter, you can use the aspnet_compiler command-line utility to
compile ASP.NET applications. This functionality is also available in
Visual Studio through the website publishing feature. While the website
copying feature is designed to let you update individual files (which
is ideal when updating a test server), the publishing feature is
intended to transfer your entire website in compiled form with a couple
of clicks.
Here's what you need to do:
Select Build => Publish Web Site from the menu. The Publish Web Site dialog box will appear (see Figure 7).
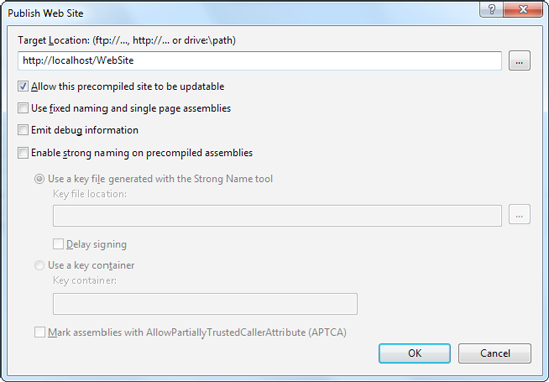
Enter
a file path or a URL for an FTP site or a FrontPage-enabled site in the
Target Location text box. To get some help, click the ellipsis (...)
next to the Target Location text box. This opens the familiar dialog
box with options for choosing (or creating) a virtual directory, file
path, FTP site, or remote server.
Leave
the other check boxes unselected. You can choose to allow updates, in
which case the code-behind files are compiled but the .aspx files with
the HTML and tags aren't compiled. This option allows you to make only
limited changes (and it increases the potential for accidental changes
or tampering), so it isn't terribly useful.
Click OK. Your website files will be compiled with aspnet_compiler and then transferred to the target location.